Scheduling a Meeting
Effective 7/20/23, new meeting passcode requirements will be enforced on the Tufts Zoom service. These requirements will impact all new scheduled meetings, as well as previously scheduled meetings that are edited after 7/20/23.
Passcode requirements:
- Passcodes must be at least SIX (6) characters in length.
- Passcodes may only contain numbers. Letters and special characters are not allowed.
- Passcodes cannot contain SIX (6) consecutive characters. (e.g. “111111”, “12345”, "abcde", "qwert")
Zoom allows you to schedule meetings ahead of time and share the meeting information with participants. Depending on how you set them up, scheduled meetings may occur either in your Personal Meeting Room or a unique location.
This page contains basic information on scheduling a Zoom meeting and inviting participants through Outlook. For more, visit the Zoom Help Center page about scheduling meetings.
- Use a unique meeting ID. This makes it more likely that only your invited participants have the meeting info. Do not use your Personal Meeting ID for scheduled meetings, as that ID number/link is constant and people could use it to jump into your meeting when you don’t want them to.
- Use a meeting passcode. Even better, make the passcode unique (i.e. hard to guess and different from passcodes you’ve used for other meetings).
- Require a meeting registration. This is a particular good option for meetings that are open for people to attend voluntarily. As the meeting scheduler, you can configure the registration in many ways, including whether registrations are approved automatically or manually. For more info, see the section below on Using the Registration feature.
- Disable the join before host option. This will ensure that you are the first person to join the meeting and you can control what happens from the very beginning.
- Enable waiting room. If enabled, people who wish to join the meeting will be forced to wait until you admit them individually or all at once.
- Only allow authenticated users from Tufts University. This will prevent people from joining your meeting unless they are signed in with valid Tufts credentials.
- If necessary, the "Authentication Exception" feature can be used to specifically invite one or more non-Tufts users (e.g. a guest lecturer, outside vendor, etc.) and allow them to skip the authentication step.
- Send out meeting info an hour or two before the meeting is set to begin. Again, this makes it more likely that only your invited participants have the meeting info.
- Don’t share the meeting information in public places! Unless it is necessary, never share your meeting information (link, ID, passcode, etc.) in places that are publicly viewable. If you do need to schedule a meeting that is open to the public, make sure to use a unique meeting ID and never your Personal Meeting ID.
- Log in to tufts.zoom.us with your Tufts username (e.g. jjumbo01) and password.
- In the Meetings page, select Schedule a New Meeting.
- A scheduling page will load where you can set the parameters for your upcoming Zoom meeting.
- Topic – Give your meeting a short, descriptive name.
- Description (Optional) – Provide a more detailed description of your meeting.

- When – Select a date and start time for your meeting.
- Duration – Estimate how long you think the meeting is going to take.
- Recurring (Optional) – Check this box if you plan on setting up a recurring meeting. More options will appear for you to set up the recurrence pattern.

- Registration (Optional) – Check the Required box if you want attendees to register for the meeting. More information can be found in the section below about using the Registration feature.
- Meeting ID – Choose “Generate Automatically” if you want Zoom to generate a unique Meeting ID for this meeting or choose “Personal Meeting ID” if you want the meeting to take place in your Personal Meeting Room.

- Passcode (Required) – Zoom will automatically generate a passcode for your meeting, but you can change it. Passcode requirements:
- Passcodes must be at least SIX (6) characters in length.
- Passcodes may only contain numbers. Letters and special characters are not allowed.
- Passcodes cannot contain SIX (6) consecutive characters. (e.g. “111111”, “12345”, "abcde", "qwert")
- Waiting Room - If this is selected, participants will enter a “waiting room” before they can officially join the meeting. The host can determine who is allowed to enter using the Participants Panel.
- Require authentication to join - Checking this box means that participants will only be able to join the meeting if they are logged in to a Zoom account. A dropdown menu will appear where you can select “Tufts University” (users can only join if logged in to a Tufts Zoom account) or “Any Zoom User” (users can join when logged in to any Zoom account, including free/basic accounts). Users who are not logged in to the specified accounts will be excluded from the meeting.
- Note: The "Authentication Exception" feature can be used to specifically invite one or more non-Tufts users (e.g. a guest lecturer, outside vendor, etc.) and allow them to skip the authentication step. For more information, see the "Using Authentication Exceptions" section.

- Note: The "Authentication Exception" feature can be used to specifically invite one or more non-Tufts users (e.g. a guest lecturer, outside vendor, etc.) and allow them to skip the authentication step. For more information, see the "Using Authentication Exceptions" section.
- Video – Determine whether you want to start the meeting with video automatically connected for the host and participants.

- Audio – This section is locked, with “Telephone and Computer Audio” selected. This gives participants the option to join the meeting with audio connected either over the phone or their computer (using VoIP, or Voice over Internet Protocol).

- Meeting Options – The following options are available.
- Allow participants to join early – This allows participants to join the meeting before the host does.
- Mute participants upon entry – Checking this box automatically mutes participants’ audio when they join the meeting. Participants will be able to unmute themselves at any time.
- Breakout Room pre-assign - Allows the host to create breakout rooms and specify who will go in each room before the meeting.
- Automatically record meeting - If checked, the meeting will begin recording as soon as it starts.
- Approve or block entry to users from specific regions/countries - Be careful of using this feature! Some of your meeting participants might be abroad!

- Alternative Hosts (Optional) – Designate participants to serve as alternative hosts for your meeting. Alternative hosts must have Tufts Zoom accounts. If alternative hosts join your meeting before you, they will get the Host role. If they join after you, they will be given a Co-host role.

- Click the Save button.
- A confirmation page will appear with all of your meeting info.

- You can copy and paste this information (Meeting ID, URL, etc.) wherever you’d like to share it, or follow the steps in the next section to invite specific participants to the meeting via Outlook.
When used with the “Require authentication to join” setting, the Authentication Exception feature enhances meeting security by allowing the scheduler to limit virtual participants to Tufts University (i.e. students, faculty, staff) while also making an exception for one or more non-Tufts participants (i.e. a guest lecturer, etc.).
When a non-Tufts participant is added as an authentication exception to a meeting, they will receive an email notification from Zoom that includes information about the meeting as well as a link that they can use to join at the appropriate time. This is a special link that will allow them to bypass the authentication (i.e. sign in with Tufts credentials) step.

Using Authentication Exceptions
- In the scheduling form, make sure the Require authentication to join option is enabled. Then, click Add next to “Authentication Exception”.

- A window will open where you can list one or more non-Tufts participants who you’d like to grant authentication exceptions to. For each of these participants, provide their name and non-Tufts email address (e.g. Gmail).

- When you’re done, click Save to add your authentication exceptions to your scheduling form.
- Your authentication exceptions will now be listed in your scheduling form.

- Continue filling out the rest of the form. When you’re done, click Save to schedule the meeting.
- After following the directions in the previous section to schedule a Zoom meeting, a confirmation page will appear. Click Copy the invitation.
- Another window will appear with a summary of the meeting information. Click the Copy Meeting Invitation button.

- Open Microsoft Outlook.
- Open your Calendar and create a new Meeting.
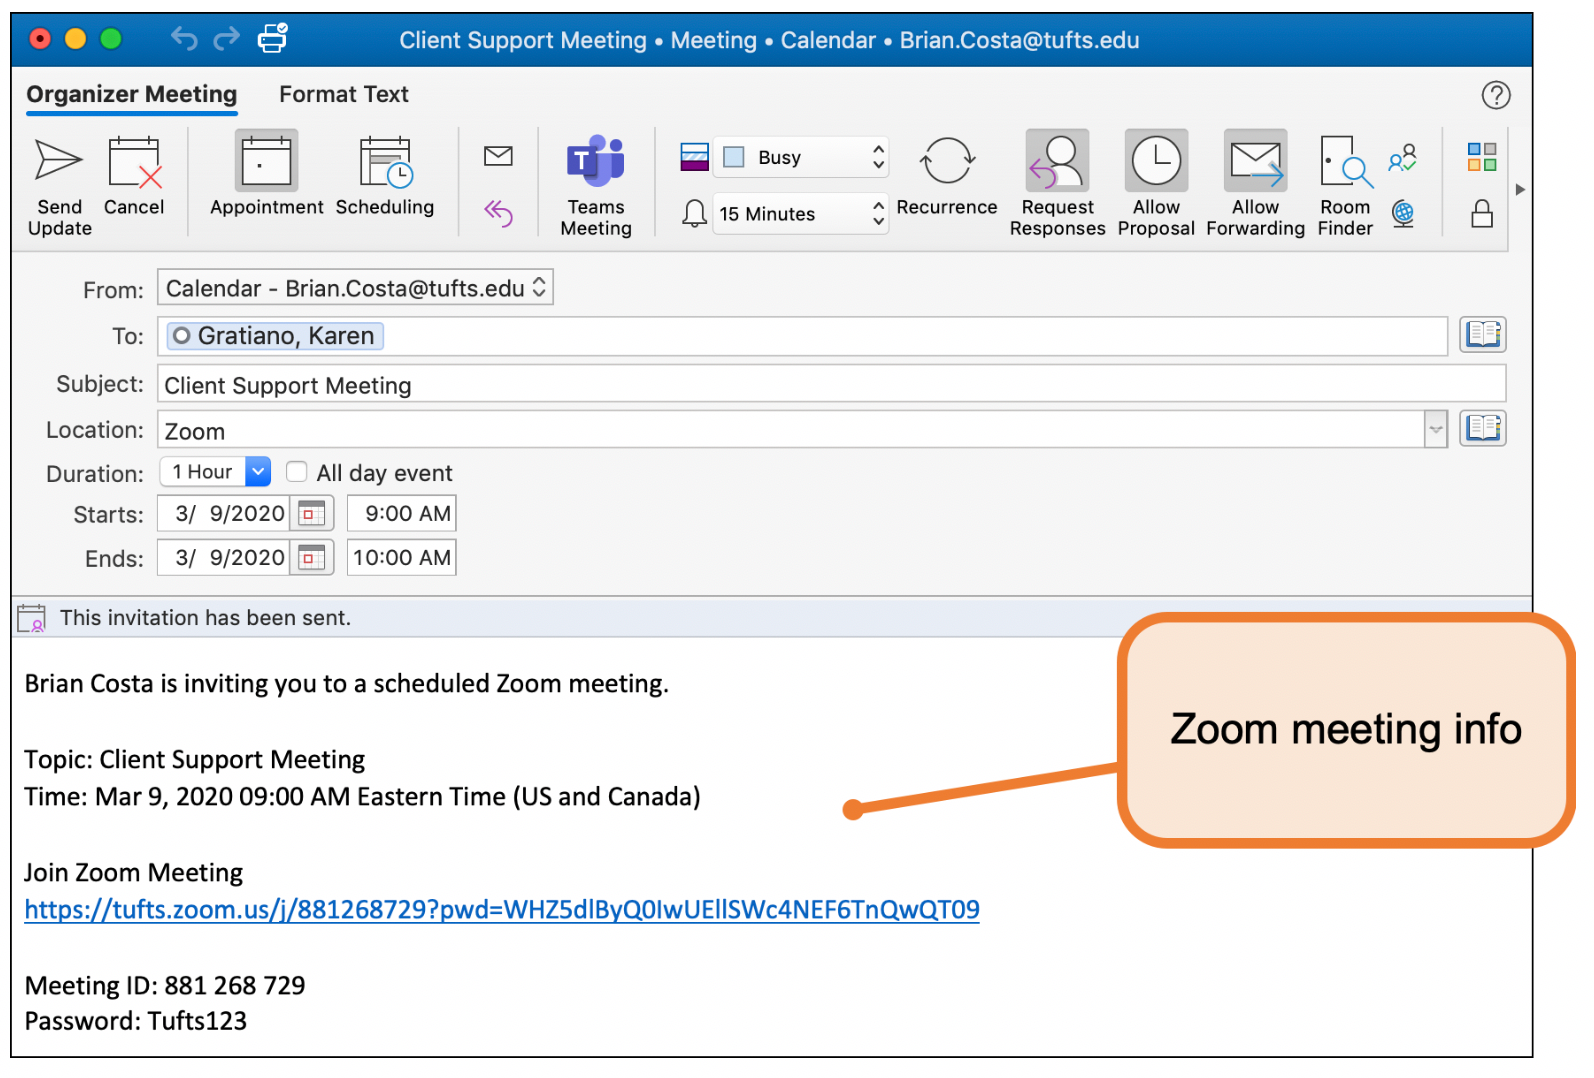
- Paste the Zoom meeting info into the body of the meeting invite.
- In the Subject field, enter your meeting topic.
- In the Location field, enter “Zoom” or the meeting URL.
- Set the invitation date and times to match your Zoom meeting.
- In the To field, add the addresses of the people you’d like to invite to the meeting.
- Click Send. The meeting will be saved to your calendar. When people accept your invitation, it will be added to their calendars as well.
When the Registration feature is enabled for a scheduled meeting, a registration link is generated. This link can then be shared via email, on a website, etc.. People who wish to attend your Zoom meeting must then complete and submit the registration form. Once their registration is accepted, the meeting information will be sent to them.
Enabling the Registration Feature
When scheduling a meeting, check the box next to Required in the Registration section. Note that this will only turn on the registration feature. You can then configure your meeting registration using the steps described below.

If you forgot to enable meeting registration while scheduling the meeting, you can edit an existing meeting and turn the registration feature on.
Once the meeting is scheduled, you will be provided with the Registration URL. This can be shared with other people so they can register for the meeting.

Configuring Registration Options
- Log in to tufts.zoom.us with your Tufts username (e.g. jjumbo01) and password.
- Find your scheduled meeting in the Upcoming Meetings page and click on the meeting topic. A page will load with information about the meeting.

- At the top of the page, there will be tabs for Registration, Email Settings, and Branding. Brief descriptions of some settings that can be configured within each of these tabs are provided below.
- Registration – Manage registration options, such as whether registrations are approved automatically or manually (by the scheduler). You can also determine what questions are asked in the registration form.
- Email Settings – Determine whether or not a confirmation email is sent to registrants when their registration is confirmed. You can also edit the subject and some of the contents of the confirmation email.
- Branding – Upload banner and logo images. The banner will appear on the invitation page for your event. The logo will appear on the invitation page, registration page, and email invitation to the meeting.

Manually Approving/Denying Registrations
If your Zoom meeting registrations require manual approval, registrations can be approved/denied by following the directions below.
- Log in to tufts.zoom.us with your Tufts username (e.g. jjumbo01) and password.
- Find your scheduled meeting in the Upcoming Meetings page and click on the meeting topic. A page will load with information about the meeting.

- Scroll down to the bottom of the page. There will be tabs for Registration, Email Settings, and Branding.
- Within the Registration tab, click the Edit button in the Manage Attendees section. A window will load with information about the registrants for your upcoming meeting.

- In the Pending Approvals tab, check the boxes next to individual registrants. You can also select all of the Pending Approvals at once using the checkbox in the top row.
- Click Approve or Deny.

If you'd like someone else to have the ability to schedule meetings on your behalf, you will have to give them permission to do so first. To learn more, visit the page on Delegates and Privileges.
The person you are scheduling a meeting for must have previously given you permission to do so. For directions on how they can do this, see the "Giving Scheduling Permissions to Someone Else" section above.
Once someone has given you scheduling privileges, their name will be listed in the “I can schedule for” section of your Zoom Settings.

When scheduling a meeting, you can select this person using the dropdown menu in the “Schedule For” field. You can also determine if the meeting will occur in a unique location or their Personal Meeting Room.

Do you find yourself scheduling the same type of Zoom meeting over and over again? Consider saving time and energy by creating a meeting template! When you schedule a new meeting from a template, that meeting will automatically have the same topic, meeting settings, and polls that are associated with the template. However, all of these things can be changed as necessary!
Creating a Zoom Meeting Template
- Log in to tufts.zoom.us with your Tufts username (e.g. jjumbo01) and password.
- Find or create a Zoom meeting to use as the basis for your scheduling template. You have two options.
- Schedule a new Zoom meeting using the directions in the “Scheduling a Meeting from the Tufts Zoom Website” section above.
- Find an existing meeting in either your Previous or Upcoming meetings lists and click on the name of the meeting to bring up the meeting information page.
- Scroll to the bottom of the meeting information page and click Save as a Meeting Template.

- Give your meeting template a name and click Save as Template.

Editing an Existing Meeting Template
- Log in to tufts.zoom.us with your Tufts username (e.g. jjumbo01) and password.
- Go to the Meetings page and click on the Meeting Templates tab to open it.

- A list of your existing templates will appear, including options to use and delete templates.
- To edit a template, click on its title.
- A meeting information page will load with information about the template’s settings. Scroll down to the bottom of the page to see editing options.
- Click Edit this Meeting Template to adjust the template name, topic, and other meeting settings. Click Save when you are done.
- Use the available options in the Poll section to add, edit, or delete polls from the template.

Scheduling a Zoom Meeting from a Template
- Log in to tufts.zoom.us with your Tufts username (e.g. jjumbo01) and password.
- Go to the Meetings page and click on the Meeting Templates tab to open it. A list of your existing templates will appear.

- Find the template you wish to use and click Use this template.
- A meeting scheduler form will appear with all of the options determined by your selected template. From here, you can adjust any options you wish, including the meeting topic, date and time, and other settings.
- When you are done, click Save.
Note: When scheduling a new Zoom meeting, you can also select an available template to use from the Use a Template field of the scheduler form.
